
- News
- Sports News
- Full Schedule 1 map: All key locations, businesses, properties, and more
Trending
This story is from April 02, 2025
Full Schedule 1 map: All key locations, businesses, properties, and more
Schedule 1 features a complex map with six regions where players can run businesses and expand their territory. Key locations include the Laundromat, Taco Ticklers, and the Casino, with two properties available for purchase. Businesses are crucial for money laundering to bypass weekly ATM limits.


Image via TVGS
Full Schedule 1 map
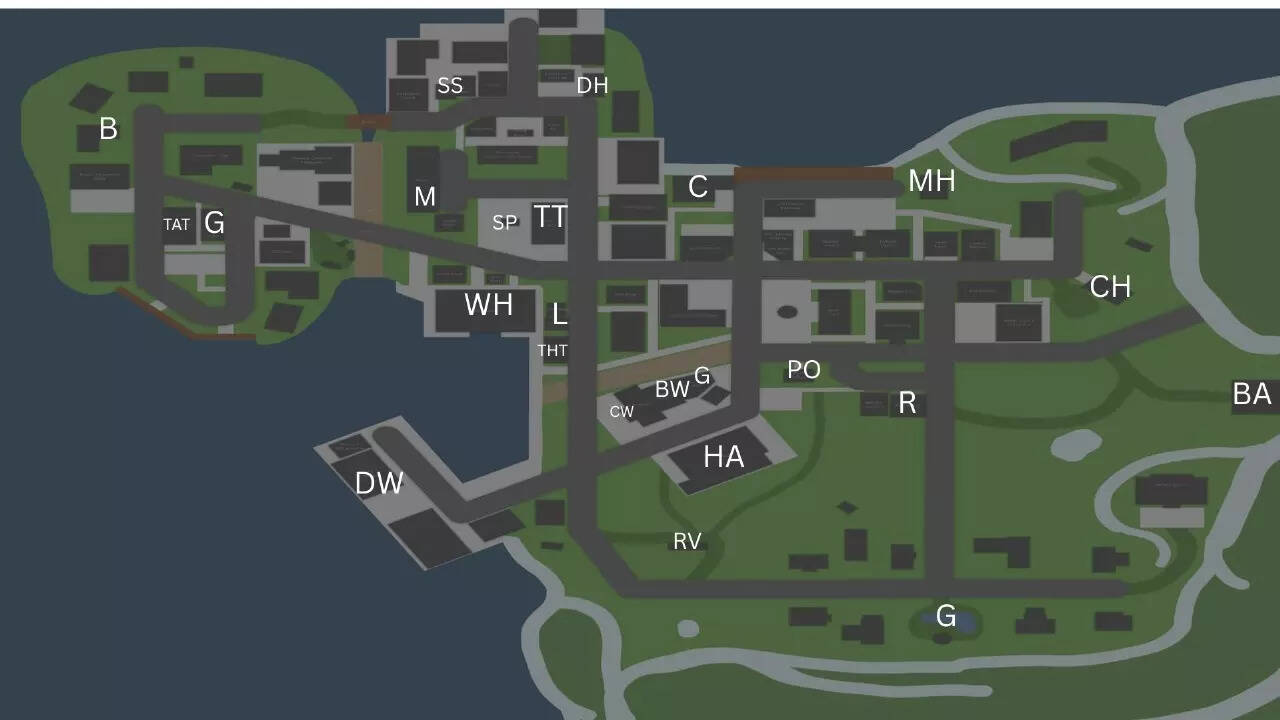
Image via TOI
- B - Bungalow
- TAT - Top’s Tattoo
- G - Gas Mart (there are two of them)
- SS - Sweatshop
- DH - Dan’s Hardware
- SP - Skate Park
- TT - Taco Ticklers
- M - Motel
- WH - Warehouse
- L - Laundromat
- THT - Thrifty Threads
- C - Casino
- CW - Car Wash
- BW - Body Wash
- HA - Hyland Auto
- RV - Initial RV that gets burnt
- G - Gazebo
- PO - Post Office
- R - Rays Realty
- BA - Barn
- CH - Church
- MH - Mayor’s House
How many properties are available in Schedule 1
How many businesses are available in Schedule 1

About the AuthorTOI Sports Desk
End of Article
Follow Us On Social Media
Top Sports News
Top Trending
Tired of too many ads?go ad free now
Trending Stories
In Sports
Entire Website
- Pandya powers India to 101-run rout, SA bowled out for lowest T20I score ever
- After viral clip of athlete loading gun, HOA body calls for strict actions
- Gill, Buttler, and the gaps around them; puzzles GT must solve in Abu Dhabi
- Pandya power: Hardik becomes fourth Indian to hit 100 T20I sixes
- Carlsen secures bonus after winning Freestyle Chess Tour C'ship early
- Vijay Shankar enters IPL 2026 Auction as uncapped player: Here's why
- Another milestone for Messi! Argentina legend becomes first ever to ...
- 'Don't see any reason': Ganguly questions Agarkar over Shami’s India snub
- 'If passion and fire not there, you won't move forward': Tendulkar
- 'It's now time to ...': Pragg after becoming first Indian to enter Candidates
- Anthony Richardson injury update: Indianapolis Colts break silence on QB's status for Seahawks matchup amid tough stretch
- Goa nightclub fire: Owner Gaurav Luthra spotted at Thailand airport
- Philip Rivers family: Meet the former Colts QB’s wife and parents
- RRB Paramedical recruitment 2025: Application status for 435 posts released; check direct link to download here
- Delhi school admissions 2026–27: How schools calculate distance; a parent’s guide
- Crackdown on Luthra brothers: Nightclub 'Romeo Lane' to be demolished
- 'He was eying my elder daughter': Live-in partner slits Lucknow techie's throat
- Rafael Nadal and Mery Perelló combined net worth in 2025: Tennis legend, family life, career, business, and more
- Kerala schools closed on Dec 9 in south and Dec 11 in north for local body elections
- India’s Right to Disconnect Bill 2025 explained: Here’s why employees can now legally switch off like France, Italy, Portugal, and Australia
Tired of too many ads?go ad free now



Explore Every Corner
Across The Globe
Streamer Awards 2026Anna Kournikova Net WorthSerena Williams Net WorthWho is Charlie SmythRussell Wilson WifeBrittany MahomesTee Higgins InjuryPatrick MahomesAyesha CurryChrisean RockShohei Ohtani vs Juan SotoQTCinderellaIND vs SA LiveRed Dead RedemptionPhilip Rivers FamilyDrake LondonRudy GobertKhamzat ChimaevJohn Cena and Shariatzadeh Net WorthWho was Enzo BadenasMarvin Harrison JrTrey Benson InjuryBobby McMannAndy Roddick and Brooklyn Decker Net WorthAnthony Richardson InjuryTekashi 6ix9ineBam AdebayoEdwin DíazDwyane Wade WifeRoger Federer Net Worth
Hot on the Web
Helen Keller QuoteEleanor Roosevelt QuoteColon CancerWiper BladesAnthony HopkinsHeart HealthHarrison FordRaw Amla Vs Amla JuiceBlood Sugar LevelsColon Cancer RiskSunjay KapurDhurandhar Movie CollectionSkin Cancer SymptomsOvercoming ConstipationBlood Sugar Control DrinksHigh Cholesterol SymptomsAnant AmbaniAishwarya Rai BachchanKidney HealthBlood PressureShatrughan SinhaAkshaye KhannaTere Ishk Mein CollectionDhurandhar Movie ReviewLucifugous WordColon Cancer SymptomsAkhanda 2 Movie ReviewRahman DakaitClove WaterTere Ishk Mein Movie ReviewVitamin DElephant Safari National ParkOvernight Habits That Affect HealthLiver Failure Warning SignsCucumber Vs ZucchiniEarly Signs Of Mouth CancerKeep The Toilet Lid Up Or DownNikhil KamathHigh Blood Pressure SymptomsSamak Rice BenefitsFor PcosPalak Vs Sarso
Trending Topics
Jonathan OwensRyan Kesler CaseDennis HildebyWB JECA Counselling 2025LeBron JamesSophie CunninghamElliotte FriedmanEvil RequiemGeorge SpringerXavier WorthyJordan ChilesRRB Paramedical Recruitment 2025Shohei OhtaniAja Wilson Net WorthAyesha CurryWilliam KarlssonNHL Match TodayDejounte MurrayPhilip RiversBooker T and Sharmell Net WorthRyan Wedding ArrestRahul GandhiT20 World CupH 1B Visa AppointmentsHardik PandyaSmriti MandhanaConnor McDavidMumbai Cyber FraudUS Lawyer Mike AndrewsLucknow MurderAnime Vanguards CodesMark ZuckerbergXbox Game PassJensen HuangPhoebe GatesNYT ConnectionsWordleThe Forge CodesJamie DimonReddit OutageiOS 26.2 UpdateSam Altman
Popular Categories
HeadlinesSports NewsBusiness NewsIndia NewsWorld NewsBollywood NewsHealth+ TipsIndian TV ShowsTechnologyTravelEtimesHealth & FitnessDelhi Gold Rate TodayNumerology Number 1 HoroscopeChinese Horoscope PredictionsAstrologyWeather TodayPlatinum Rate TodaySilver Rate TodayGold Rate TodayIs Bank open todayIs Bank Open TomorrowBank Holidays in DecemberPublic Holidays in DecemberStock Market HolidaysNFL ScheduleTechnology NewsInternational SportsPublic HolidaysBank Holidays
Trending Videos
NYC Apartment Turns Into Fireball As Exploding Flames Shatter Windows And Torch The Entire RoofPutin ‘Cheers’ As Trump Ally Japan ‘Blocks’ EU Effort To Seize Frozen Russian FundsJakarta Office Inferno Kills 22 As Trapped Workers Fight For Life In Deadly Smoke3 Idiots 2 in the Works: Original Team Reunites 15 Years Later for a New Cinematic Journey'Ilhan Omar Only Complains': Trump Sharpens Attack On Minnesota Dem, Calls Somalia A DISASTERDileep’s acquittal shocks industry as six co-accused convicted in high-profile Kerala actor assault case'TOO BUSY TO PICK HER CALLS': Trump Mocks Marjorie, Defends Foreign Trips Bringing 'Trillions To USNATO Ally Deals Major Blow To Trump, Rejects New US Policy | ‘America First Fine, But Alone Not…’US Military To Attack Venezuela? Trump Refuses To Rule Out Action Against Maduro | WatchOfficials Warn Habituated Bear Could Face Euthanization After Shocking Parade AppearancePutin & Xi's 9 Warplanes Trigger Red Alert In Trump Ally Nation; South Korea Scrambles Jets | WatchPutin’s Friend Goes Nuclear At NATO Military Buildup On Border: ‘Balloons Fly To Lithuania Because…’'Vande Mataram Not Limited To Bengal': Amit Shah Blasts Opposition In Rajya SabhaRajya Sabha Erupts In Laughter Over Kharge's 'Chanakya' Remark On Jairam RameshZelensky Responds To Trump’s Ukraine Peace Push; ‘Won’t Surrender' | Watch'Singapura Derived From Sanskrit': Singapore's Ex-Deputy PM Highlights India's InfluenceAudience Boos Trump As Jon Stewart Shreds ‘Thirsty’ U.S. President In Viral 'The Daily Show' SegmentAkshaye Khanna dominates Dhurandhar wave; Farah Khan’s “deserves an Oscar” remark fuels frenzy
Latest News
Libra Daily Horoscope Today, December 10, 2025: A turning point will arrive suddenly, don’t reject itLos Angeles Dodgers star Shohei Ohtani earns AP Male Athlete of the Year honor for record-tying fourth time“You make every room brighter”: Gisele Bündchen makes rare appearance in Tom Brady’s heartfelt Instagram postGoogle and Apple will soon make its easier to switch between Android and iOSVishal Dadlani calls Anuv Jain’s performance at Jacob Collier’s Mumbai concert ‘embarrassing’, asks, ‘Is it part of some corporate mandate somewhere?’THIS one lifestyle habit lowers risk for 7 major cancersVirgo Daily Horoscope Today, December 10, 2025: Fate is moving pieces for you, stay alignedChallenge: Only 1 in 100 can spot the chicken hiding among these roosters in less than 10 secondsCuriosity Corner: Why is Grandma’s hair white? Did she paint it?Andrew Tate shares honest take on upcoming Jake Paul vs Anthony Joshua fight before his Dubai debut“You lose actual connection”: Ed Sheeran breaks silence on shift in friendship with Taylor Swift after her engagement to Travis KelceKids as young as 11 dabbling in drugs, shows 10-city surveyPlan to make AI developers pay for contentCandace Owens drops new claim on Charlie Kirk killing and alleges possible US military involvementNadella pledges $17.5 billion AI, cloud funding in IndiaR Madhavan on limited screen time in Dhurandhar, promises a bigger role in sequel, ‘There is a lot of my character as he trains Ranveer Singh’Samsung's One UI 8.5 beta now rolling out to Galaxy S25 users: Here are all the new featuresLeo Daily Horoscope Today, December 10, 2025: A breakthrough hides in today’s silence, look deeper
Copyright © 2025 Bennett, Coleman & Co. Ltd. All rights reserved. For reprint rights: Times Syndication Service